Exporting multi-platform-compatible QuickTime movies from Apple iMovie
Marion Bates <mbates at whoopis.com>
QuickTime 7 has a new compression codec (H.264) that gives you huge compression with very little quality loss. BUT the resulting movie is not (yet) playable on Windows -- users will get a "codec not found" error and/or a blank movie screen.
This howto describes a method (there are undoubtedly others) of using iMovie to modify and compress a raw QuickTime movie file using settings that will ensure playback compatbility on Macs with QuickTime 6 or 7 AND Windows with QuickTime 6.5.1 (current as of this writing.)
- Launch iMovie, make a new or open an existing project, drop your existing uncompressed/incompatible QuickTime video into the lower part of the window where it says "Drag clips here to build your project".
- Make your edits, if any. E.g. to add a title, click on the "Titles" button, choose a title style (in my example, "Centered Title"), enter your title text, choose font face and size, etc. Hit Preview button to see what it will look like. When you've got something you like, click and drag the "Centered Title" entry from the list to your clips area, to the left of your first clip; that first clip will slide out of the way. Drop your title and wait for it to apply. You will then see what looks like a copy of your clip, but in fact it is the first few seconds of your original clip, reprocessed with the superimposed title.

Under the "Trans" (transitions) button, you can add fades or wipes to the beginning and/or end of your film in a similar fashion -- choose, tweak, drag, and drop. For Effects, first select one or more clips, then select an effect and Apply it to add it to the project.
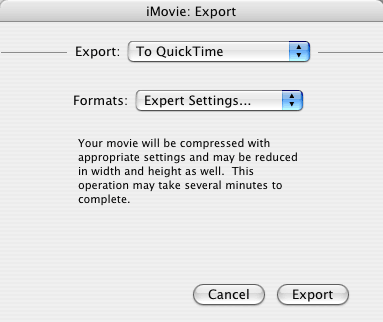
- Choose "export" and pick "To QuickTime" in the Export: options, and "Expert Settings" in the Formats: options. Hit Export button.
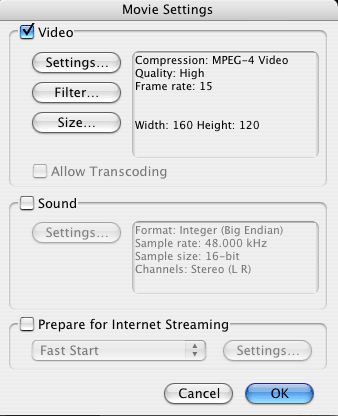
- In the Export: options, choose "Movie to QuickTime Movie" and hit the "Options" button.

- In the Movie Settings window, uncheck Sound if your movie has no sound, and uncheck "Prepare for Internet Streaming" unless you know you care about that. Then hit the Video section's "Settings" button.
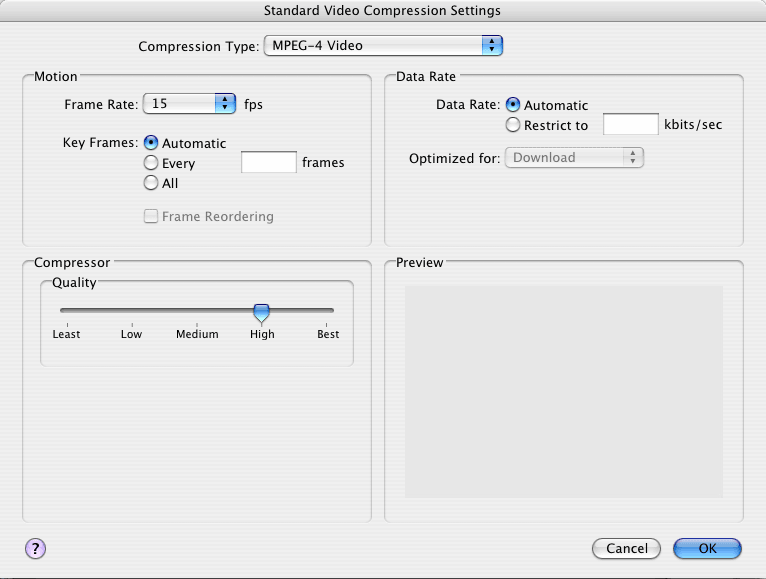
- Make choices as shown here (MPEG-4 Video, Frame Rate 15fps unless you know otherwise, key frames Automatic, data rate automatic, quality High.) Hit OK, OK, Save.
The resulting movie should play in a browser with the QuickTime plugin on Windows or Mac, and should be pretty high quality and still a small file.
NOTE: If you attempt to import a large QuickTime movie and iMovie fails with "error -40", try the following:
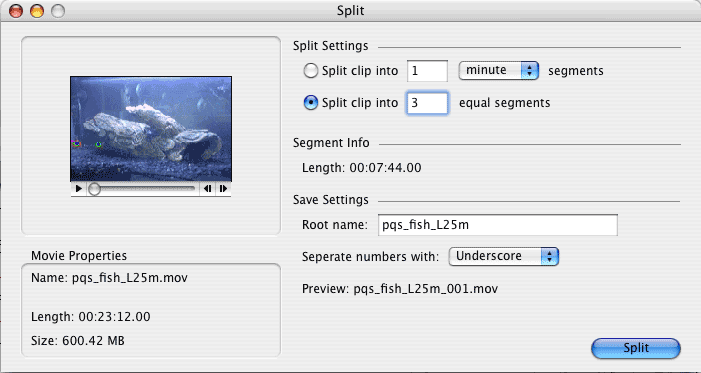
- Download and install SplitFuse (shareware).
- Launch it and click "Split Clip" button. Drag your too-large movie into the window and click the radio button for "split into equal chunks" and pick a number. In my case, the source was a 600MB 23-minute video and I had to make it into three separate 7:45 chunks in order for iMovie to be able to digest them one at a time. I believe you can only split into a maximum of five chunks without registering the software, but it's only $8 to register.
- After it's finished splitting, process each chunk through iMovie as outlined above.
- Go back to SplitFuse and use the "Fuse Clips" button. Drag your clips into the window, and re-order them if necessary by dragging them around in the list.

- Check the "Save self-contained movie" box and Fuse.
References/Resources: