Creating Standalone Tcl/Tk Applications
Marion Bates <mbates at whoopis.com>
This began as a short howto on adding your own little image "brushes" to Coccinella, a Jabber-compatible open-source collaborative whiteboard system, written in Tcl/Tk by Mats Bengtsson. But then it became more about how to make standalone executables from Tcl/Tk code. So, the Coccinella-specific stuff can be thought of as the working example for how to create binaries out of Tcl/Tk source. Please keep in mind that I know nearly nothing about Tcl/Tk, so my methods here may not be very efficient or "correct," and may not generalize to all Tcl/Tk scripts (I have only done this with Coccinella).
Mac OS X Preparation, method #1:
- Download Mats's precompiled OS X binary, right click on the icon and Show Package Contents, and go to
Contents->Resources->Scripts->Coccinella
- For the Coccinella-specific image Library mod, follow the steps in the Main section below.
- Close all the open Finder windows and double-click the Mac app icon to launch your newly-customized version of Coccinella.
Mac OS X Preparation, method #2: (i.e. if you plan to do substantial hacking of this source)
- Download and install TclTkAqua package from SourceForge. At time of this writing, the version I used was 8.4.9.0.
- Download and untar Coccinella source from here.
- Edit {sourcedir}/tclXML/tclparser-8.1.tcl. Find the line
package require xmldefs 2.0
and change it to
package require xmldefs 3.1
- Test to make sure all is well. Go to the Terminal, cd into the source directory, and
chmod 755 Coccinella.tcl
./Coccinella.tcl
Leave the Terminal open. After a few moments, Coccinella should start up normally (splash screen etc.) Quit Coccinella and you should get your prompt back in the Terminal window.
- For the Coccinella-specific image Library mod, follow the steps in the Main section below.
- NOTE: I don't know how to now turn this back into a .app package. If you do know, please tell me.
Building Windows and Linux executables: (Mats Bengtsson's method)
Get SDX. Download http://www.equi4.com/pub/sk/sdx.kit
Rename the file, "mv sdx.kit sdx"
Make it executable, "chmod +x sdx"
sudo mv sdx /usr/bin (so it is in the default PATH)
Get tclkit. Go to http://www.equi4.com/pub/tk/, then "8.4.9/", and download the version for your machine that you will be building on. In my case, since I am using Mac OS X, it was "tclkit-darwin-ppc.gz". Un-gzip-it with Stuffit or gzip -d tclkit-darwin-ppc.gz.
Rename the file, "mv tclkit-darwin-ppc tclkit"
Make it executable, "chmod +x tclkit"
sudo mv tclkit /usr/bin (so it is in the default PATH)
- Get Windows tclkit. NOTE: 8.4.9 has a bug, use 8.4.1. Go to http://www.equi4.com/pub/tk/tclkitsh-win32.upx.exe, then "8.4.1/", and download "tclkit-win32.upx.exe".
- Get linux tclkit. Go to http://www.equi4.com/pub/tk/, then "8.4.9/", and download "tclkit-linux-XXXXX.upx.bin" where XXXXX is your architecture. In my case, x86.
- Get Coccinella source and Mats's "BuildCoccinella.tcl" script from http://coccinella.sourceforge.net/.
- For the Coccinella-specific image Library mod, follow the steps in the Main section below.
- Adjust build script. Open BuildCoccinella.tcl in a real text editor like BBEdit or vim. Find the section
# Hardcoded for my machine!
array set tclkit {
    linux   /root/Tcl/TclKits/8.4.5/tclkit-linux-x86.upx.bin
    windows /root/Tcl/TclKits/8.4.1/tclkit-win32.upx.exe
}
and adjust the paths accordingly -- in this example,
# Hardcoded for my machine!
array set tclkit {
    linux   /Users/mbates/Desktop/build/tclkit-linux-x86.upx.bin
    windows /Users/mbates/Desktop/build/tclkit-win32.upx.exe
}
Finally, save the changes, and make the file executable (chmod +x BuildCoccinella.tcl).
- Get organized. Make a directory, in this example, ~/Desktop/build (full path /Users/mbates/Desktop/build).
Into this directory, put:
- Coccinella source directory, renamed just "coccinella"
- The Windows and Linux tclkit files you downloaded above
- BuildCoccinella.tcl
- Run the build! In the Terminal:
cd /Users/mbates/Desktop/build/
./BuildCoccinella.tcl
Your output should look something like this. You'll get prompted for a version number, enter something sane:
mbates@apocalypse build$ ./BuildCoccinella.tcl
rootdir=/Users/mbates/Desktop/build
Version number: 0.95.5.1
BuildSources Coccinella
copy coccinella Coccinella-0.95.5.1Src
PurgeDirRecursive
building source tar archive Coccinella-0.95.5.1Src.tar.gz
BuildEmptyVFS /Users/mbates/Desktop/build/linux
BuildVFS linux /Users/mbates/Desktop/build/linux/Coccinella-0.95.5.1.vfs
PurgeNonplatformBins linux /Users/mbates/Desktop/build/linux/Coccinella-0.95.5.1.vfs/lib/app-Coccinella/bin
PurgePlatformBins macosx /Users/mbates/Desktop/build/linux/Coccinella-0.95.5.1.vfs/lib/app-Coccinella/bin
         /Users/mbates/Desktop/build/linux/Coccinella-0.95.5.1.vfs/lib/app-Coccinella/bin/macosx/PowerMacintosh
PurgePlatformBins windows /Users/mbates/Desktop/build/linux/Coccinella-0.95.5.1.vfs/lib/app-Coccinella/bin
         /Users/mbates/Desktop/build/linux/Coccinella-0.95.5.1.vfs/lib/app-Coccinella/bin/windows/intel
sdx wrap linux Coccinella-0.95.5.1.bin
making Coccinella-0.95.5.1Linux-x86
BuildEmptyVFS /Users/mbates/Desktop/build/windows
BuildVFS windows /Users/mbates/Desktop/build/windows/Coccinella-0.95.5.1.vfs
PurgeNonplatformBins windows /Users/mbates/Desktop/build/windows/Coccinella-0.95.5.1.vfs/lib/app-Coccinella/bin
PurgePlatformBins macosx /Users/mbates/Desktop/build/windows/Coccinella-0.95.5.1.vfs/lib/app-Coccinella/bin
         /Users/mbates/Desktop/build/windows/Coccinella-0.95.5.1.vfs/lib/app-Coccinella/bin/macosx/PowerMacintosh
PurgePlatformBins linux /Users/mbates/Desktop/build/windows/Coccinella-0.95.5.1.vfs/lib/app-Coccinella/bin
         /Users/mbates/Desktop/build/windows/Coccinella-0.95.5.1.vfs/lib/app-Coccinella/bin/unix/Linux/i686
sdx wrap windows Coccinella-0.95.5.1.exe
making Coccinella-0.95.5.1Win
finished!
mbates@apocalypse build$
If you get errors about "sdx not found" or "tclkit not found", check to see that each of them has been a) renamed to just "sdx" and just "tclkit" respectively, b) that they are in your default path (/usr/bin works), and c) that they are both set to be executable (chmod +x /usr/bin/sdx and /usr/bin/tclkit). Then try running the script again.
- View the results. Upon finishing successfully, you will have some new stuff in "build":
drwxr-xr-x  26 mbates  staff      884  7 Apr 13:16 Coccinella-0.95.5.1Src
-rw-r--r--   1 mbates  staff  3866768  7 Apr 13:16 Coccinella-0.95.5.1Src.tar.gz
drwxr-xr-x   5 mbates  staff      170  7 Apr 13:16 linux
drwxr-xr-x   5 mbates  staff      170  7 Apr 13:16 windows
In order:
- Coccinella-0.95.5.1Src -- a new source directory copied from "coccinella"
- Coccinella-0.95.5.1Src.tar.gz -- that new source directory, compressed and ready for distribution
- linux - a directory containing the linux executable, compressed and uncompressed, and a directory with readmes, changelog, and another copy of the uncompressed executable (oops?):
- -rwxr-xr-x 1 mbates staff 3875964 7 Apr 13:16 Coccinella-0.95.5.1.bin
- drwxr-xr-x 6 mbates staff 204 7 Apr 13:16 Coccinella-0.95.5.1Linux-x86
- -rw-r--r-- 1 mbates staff 3850814 7 Apr 13:16 Coccinella-0.95.5.1Linux-x86.tar.gz
- windows - same story as Linux, but the Windows version, duh.
- -rwxr-xr-x 1 mbates staff 3785716 7 Apr 13:16 Coccinella-0.95.5.1.exe
- drwxr-xr-x 6 mbates staff 204 7 Apr 13:16 Coccinella-0.95.5.1Win
- -rw-r--r-- 1 mbates staff 3755912 7 Apr 13:16 Coccinella-0.95.5.1WinREZIP.tar.gz
You should be able to happily take these executables and run them on their respective platforms without any trouble.
To perform this process on linux, all is fundamentally the same except that the version of tclkit that you download needs to be the proper version for your architecture. In other words, tclkit is the main thing that performs this build process, and thus needs to match the machine you're building on. SDX is used also, but is cross-platform so the same version works no matter what your build platform is. The other two tclkit downloads are resources that get wrapped into the build regardess of what build platform you're on. You build both binaries no matter what machine you're running the build on.
The same story is true for building under Windows, BUT you also need to download SDX.bat from here, and you're on your own as far as DOS and paths go, cuz I haven't a clue.
Building Windows executables: (my accidentally-discovered method; Mats's is better)
- Download and untar Coccinella source from here.
- For the Coccinella-specific image Library mod, follow the steps in the Main section below.
- Download and install the trial version (good for 21 days) of Tcl Dev Kit from Active State from here.
- Launch TclApp from the Start menu.
- Click the 3rd button from the left to "Wrap all files found under directory" (mouse-hover to pop up help hints).

- Choose the Coccinella source directory. It will take a few seconds to load and display all the source files.
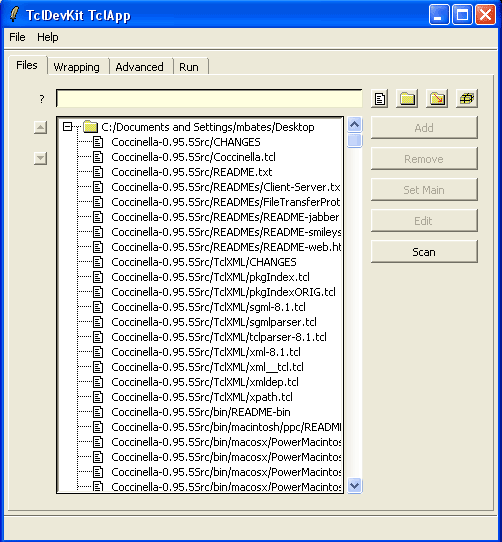
- Click once on the file "Coccinella.tcl" (near the top of the file list) and then click the "Set Main" button.

NOTE: If you get errors about "node not found" or "directory not found", exit and relaunch TclApp and try again. I dunno if it's a bug, or a problem with my system, but that happened once.
- Now click the "Wrapping" tab and click the "Browse..." button for Prefix File. It should by default open the C:/Tcl/bin directory. Choose "base-tk-win32-ix86.exe."

You can also change the output file default path and name at the bottom of this screen.
NOTE: I don't know if it is possible to change the default icon or the application properties at this stage; I think you can use some sort of Windows resource editor to customize the icon/properties after the fact.
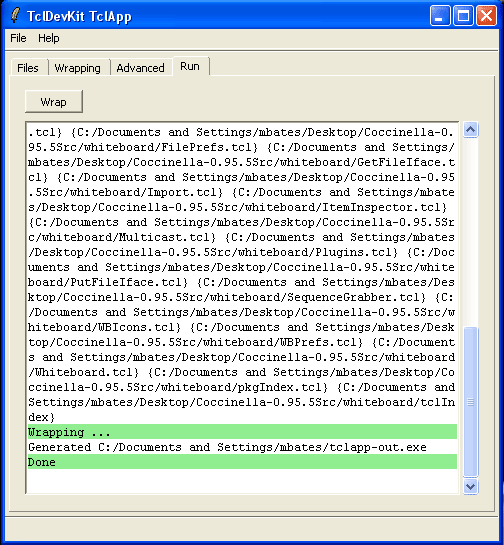
- Now click the "Run" tab and hit the "Wrap" button. It will spew a lot of text output, and churn for awhile; at the end, it should say "Done" like in this screen shot.
- The finished product will have whatever name you gave it, and a feather icon. If you double-click it, it should launch and behave just like the precompiled Coccinella application. Though, the app size is bigger (5MB as opposed to the 3.6MB version Mats creates).
Main Steps for Coccinella image library mod:
- In the source directory, go to the "items" dir and find the "ladyBug.can" file. Make a duplicate of it and rename it to whatever you want it to appear as in the menu; for the sake of example, let's say I want to add this Atari space invader, called "invader.gif":

So, I'm going to rename my copied ladyBug.can file to "invader.can".
- Now open invader.can in a text editor (NOT TextEdit, it will try to make an RTF document which will hose things -- use BBEdit or vi or another plain text editor). It should look like this:
# Version: 2
import 21.0 61.0 -tags xxx/66898426 -file ../images/ladybug.gif -width 54 -height 108
You will need to change two things here: 1) The path/filename, and 2) the image width/height (in pixels).
Note that the path to the image file is relative -- in other words, it is based on the location of this (invader.can) file. The path says, "go up one directory and descend into the 'images' directory to find 'ladybug.gif'." If you want to, say, put your custom images in their own submenu, called "custom", then make a directory under images called "custom" and edit the path in your .can file(s) accordingly:
... -file ../images/custom/invader.gif ...
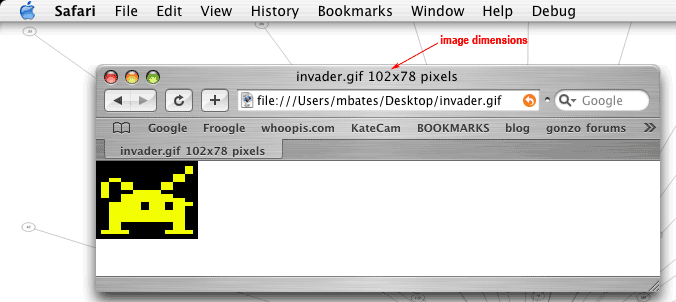
And of course the filename needs to match. Then, change the width and height to match your image; if you don't know your image's dimensions, open it in a browser and look at the dimensions in the title bar (see screenshot). This works in Apple's Safari browser, I think in Firefox and other Mozilla offspring you can right-click and get info on an image to see its dimensions.
So then my invader.can file would look like this:
# Version: 2
import 21.0 61.0 -tags xxx/66898426 -file ../images/custom/invader.gif -width 102 -height 78
Save and exit from the editor.
- Re-launch Coccinella the way you did in step 4. Go to the Library menu and see your new image!

NOTE: Other Coccinella users will be able to see this image if you use it, because of the nature of the server/client communication (the invader.gif file will be "pushed" to the clients). However, they themselves will not be able to see and use the invader option in their own Library menus unless you make this same mod on their version of Coccinella.
NOTE: Turns out that there is an even simpler way to add images to the menu, in a more-ephemeral way. Mats Bengtsson writes:
If you look at the whiteboard's File menu there is a "Save As Object"
entry that saves the current whiteboard content as Library item
the next time you launch Coccinella. The canvas file is saved
in the prefs directory, but with links to any image files.
So if you move the image file a "broken link" is the result.
If you run from sources just place any images within the coccinella/
directory (so they are somewhat protected) and import the image
in the whiteboard as usual. Then just save the canvas in coccinella/items
directory. That should be enough. You shouldn't need to edit any files.
So, I still don't know exactly what all the data inside the .can files _means_, but this is how it normally gets generated I guess. :) The new items get saved to an "items" directory under ~/Library/Preferences/Coccinella/ on Mac OS X.
References/Resources: